Thursday, July 7, 2016

Use Forex Trading as Part Time Earning Method....

If you working almost all of your time with your computer and if you are wasting lot more time by surfing on social media or wasting your time by reading gossips THIS IS THE IDEAL PART TIME JOB FOR YOU. If you believe in me, you can multiply your investment by 10 times within one month of period. The method that I am going to introduce you is Investing on Foreign Exchange Market or simply FOREX Trading.


According to the Wikipedia the FOREX or Foreign Exchange Market is a global decentralized market for the trading of currencies. This includes all aspects of buying, selling and exchanging currencies at current or determined prices. In terms of volume of trading, it is by far the largest market in the world. You can read more about FOREX by following this Wikipedia URL.

The most easiest way to understand the Foreign Exchange Market concepts is by thinking more analogues to the share market that you have already know. If you have some basic understanding of the share market in your country, it is very easy to understand the FOREX concepts. If you don't have such knowledge, don't be worry since I have written this article in very basic manner. My intention is to write this article in manner it is understandable to anybody who read this article very carefully.

First think about the Share Market in your own country. Which has set of registered companies. People could buy shares of those registered companies. Share of a company has a particular value just like 1$ per share. That share value fluctuates due to various management factors inside the company. People could buy something like 100 share and it cost 100$. People who buy the shares could sell them again when a share value become something like 1.2$. Then they would get 120$. That's how the share market works.

 Similar to the "Companies" in the share market, "Currency Pairs" are in the FOREX market. As an example GBP/USD is an one such currency pair. That is the amount of USD required to purchase a GBP. Which gives you a value like 1.2944 at the time of writing this article. Every currency pair has a value and that value fluctuates rapidly due to various economic factors.

You might wonder that how people could earn profit by investing on Foreign exchange market. Following example would show you that how actually it happens.

Imagine that you have invested $100 in the Foreign Exchange Market and Purchase GBP when the exchange rate becomes 1.3000. If you sell this GBP amount when the exchange rate becomes 1.3100 you will get more USD than you invested. This is a very simple theory and the vise versa of this concept also applies.


That means you can sell GBP at the rate of 1.3100 to purchase USD. At this time you get more USD because the rate is high. Imagine that after some time when the rate becomes 1.3000 you are going to buy GBP from the USD you have. You would be getting more GBP thn previously you have because the rate is lower.


One thing to remember is that you don't need to invest GBP to sell GBP. That currency conversion is automatically done by the FOREX Market. This concept is shown in the following figure.
The main advantage of FOREX is that you can earn profit irrespective of market is rising or market is falling.

Now you have the basic understanding to start with the forex. When you go further try to understand the way the market handles, in comparison with the Stock Exchange in your own country.

We cannot directly invest on foreign exchange market as individuals. There is brokering companies they act as a conveyer in between us and forex market. This is analogous to how stock market operates. There are so many brokering companies around the world. I am using NordFX as my brokering company because of their extensive customer support, financial security and highly efficient software platform they provide for us.

From this point onward I am explaining you how to open an account in NordFX and how to practice in trading before investing on forex market.

Follow the www.nordfx.com link to go to the brokering company's official web site and click on "Open Trading Account" link as shown in the following figure.


Once you click on the "Open Trading Account" link you will get a web page similar to the image I am showing below. Fill the correct information of your own since it is financial related. It is better your name inserting here is the same that you use in your bank accounts. Then you can directly transfer your profit to your bank account. Use the same Account type and Leverage details that I am showing in the image below. I will explain the usefulness of those details, once you start trading. The most important thing is once you submit the details to the NordFX they will send you a page with Pin Number and the password. This Pin Number is the most important thing when you want to withdraw funds. Therefore firmly keep in mind that once you get the "Registration Successful" page save it on a Notepad and get a Screenshot.


The most important details that I am mentioned above is the following registration successful screen, which contains the Passwords and Pin Code. Please keep in mind to save several copies of these details in a secure place.


Now you have successfully open a Trading Account in the forex market. Then login to your trading account by using your account number and trader's password.

When you login to your NordFX trading account you are initially directed to Trader's Cabinet. Trader's Cabinet has simple top level menus that directed to different operations. The first thing you want to do is download and install the trading platform in your computer. The trading platform the NordFX supports is Meta Trader 4 platform. It is an very simple but highly efficient and advanced trading platform. To download the platform use the step by step instructions given below.

Log in to your trading account and click on "FOREX" menu.

Then click on "Download the Platforms" menu.


And finally click on "Download Meta Trader 4" link.
Then Meta Trader 4 (MT4) setup downloads to your computer and install it. Once the installation get finished, you will get a screen to log in to your trading account. You can login to your trading account right now. But my recommendation is to instead of logging to your real trading account, create a demo trading account and practice on how to trade and earn profit on the market. Please follow the following instructions to create a demo trading account in you MT4 platform.

Open MT4 Platform and click on File > Open an account as shown in the following figure.


Then select "NordGroupInv-Demo" Server and click Next.
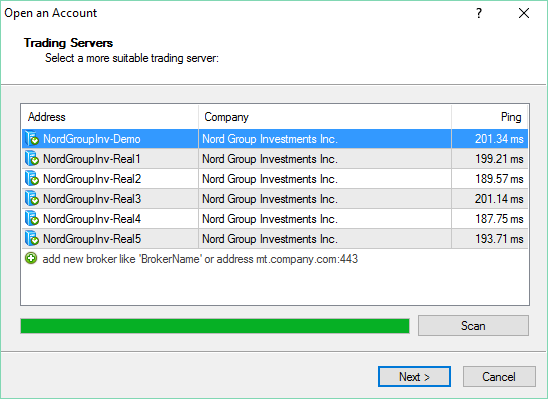


Then you have to provide some details requested in the following screens respectively. The Important thing is that select leverage as 1:500. Then tick on the subscribe to the newsletter and click next to finish the demo account creation. Once you finished you will get a screen which contains account information of the demo account. Please get a screen shot of that screen as well for your safe, but you never required to login using same details since the next time you open MT4 Trader it will automatically log on to your demo account. You can create any number of demo accounts and it will valid for two weeks of period. Actually these demo accounts are working in the same way that the real accounts are working, except the initial investment is virtual money provided by the brokering company.
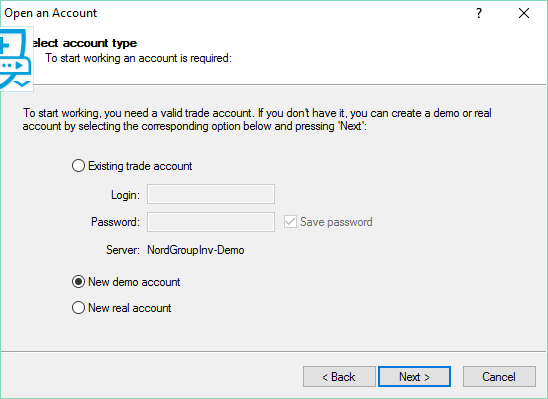


Now you have open the demo account and about to practice trading. Before head in to the world of trading you should have some basic knowledge about the trading concepts. It is more worthwhile to understand the concepts of trading more analogous to stock market concepts.

I was previously explained that similar to the different companies in the share market, there are different currency pairs in the forex market. The person who invest on the share market purchase shares from the different companies and each share has particular value. In the forex market you purchase (buy or sell) Lots.

The concept of Lot is explained in following example.

Imagine you buy or sell GBP/USD currency pair in the forex market for the exchange rate of 1.3000. Then in order to purchase 1Lot of GBP you need 1.3000 x 100,000 USD. Here 100,000 is a constant value for any currency pair.

1Lot of GBP   =   1.3000 x 100,000 USD
                       =  130,000 USD

Usually in the real trading accounts the minimum amount that we can purchase is 0.01 Lot. This value is 0.1Lot in demo accounts.

Therefore USD requirement for the purchase of 0.01Lot is,

0.01Lot of GBP     =   130,000/100
                              =   1300USD

1300USD is not an affordable value for the most of individuals who invest on forex market. The leverage is provided at this stage by the stock brokering companies to reduce the amount that we actually required to pay.

NordFX provides 1:500 Leverage for its customers. Such that the actual USD requirement to purchase 0.01 Lot is,

0.01Lot of GBP under 1:500 Leverage    =   1300/500
                                                                 =   2.6USD


Therefore margin requirement to buy/sell GBP/USD pair at the exchange rate of 1.3000 is 2.6 USD. This value is a affordable value for majority of individuals. If you invest 100USD in the forex market free margin is 97.4USD at this stage.

The next important concept you need to understand is the term called "Pip". Pip is the amount change in the exchange rate. If you imagine GBP/USD fluctuates from 1.3000 to 1.3100, it is called a change of 100pips. Change of 100pips means it will create a profit/loss of 10USD when the Lot size is 0.01. If the lot size is 0.02 the profit/loss amount is 20USD. The same concepts applies to any lot sizes and any currency pair. Which is shown in the following figure.


Now you are capable enough to trade on Meta Trader 4 platform under the demo account. So lets get start to climb up the ladder. Open the MT4 platform, then you will get a window as shown below.


Right click on any chart window then select Trading > New Order or simply press F9. Then you get a window as shown below.


Set volume as 0.1 in your demo account and click on buy or sell without any instinct. Then analyze what will happen to your order, whether it get loss or earn profit at the bottom pane of the platform and try to understand what is actually happening. If you have experienced by investing on stock market, try to understand how to earn profit by making transactions in both directions. That is buying and selling.


While you are practicing on your demo account you can do a another important thing in parallel. That is verify your NordFX account. If you carefully look at the right pane of your traders cabinet you will see a section like shown in the following figure. 


Instead of "Verified" you will see that verification status is "Not Verified". In order to verify your account you have to provide the copies of following documents.
  1. Copy of Driving License/ National Identity Card
  2. Billing proof for your address provided.
The above copies should be in a image format. Even you can take photos from your phone and uploaded to NordFX web site.
To upload the document go to the Traders Cabinet > Personal Settings > Upload Documents section. Then you will get a screen as shown below.

Once you upload the documents, It will be checked by NordFX and verified within few hours.

I hope you have been trained on your demo account so far and you understand the way you earn profit form forex. If you couldn't earn profit form the demo account don't be worry since you haven't had any training on how to trade in forex. I am explaining the most important methods to trade without making any losses at the end of this article.

The next step and the most important step is how to deposit money in to your real account. There is no limitation on the deposit amount, you can deposit any amount to your real account. But I guide you in this article to trade without losses. You should really concern on the losses happen in the forex market and you must always trade without making any losses. For that you need some amount of investment in your trading account. Therefore I recommend you to invest $100 to your real account initially. There is no matter that if you don't have $100 with you, then you can invest even $50. This $100 is the level that you can bare the risk. That means you can get loss this $100 at any undesirable situation. ( That will never happen if you correctly follow my guidelines )

If you go to Traders Cabinet > Financial Operations > Funds Deposit section you will find many fund deposit methods. I recommend to you use online payment system like Skrill or Neteller to invest money to your account among all of these methods. I am using Neteller to deposit and withdraw money. Then I don't need to link my credit or debit cards directly to the NordFX. The other advantage of Neteller is they will provide you a Master card to withdraw money from any ATM machine in your own country.

To open a Neteller account use the following link to go to the Netter official web site. https://www.neteller.com/en  Click on Join for Free and submit the very few details they requested. Please keep in mind to provide the account currency as USD since we invest USD to our NordFX account. At the end of account creation you will get the Welcome to Nettler Screen with your Nettler secure ID. Please save that information in a secure place since you will not be shown that information again and Secure ID is required to withdraw or deposit money to your account.

Then login to your Nettler account and go to the account section in the left pane. Then you will be guide to the account verification. Where you have to add money to your Nettler account, Provide verification questions and Provide verification documents. Nettler is very secure payment system therefore use your credit or debit card to add $100 to your Nettler account. For document verification upload the same documents used at the NordFX account verification. Once your Nettler account is verified you can use Neteller to deposit money to NordFX.

Again log in to the NordFX Trades Cabinet > Financial Operations > Funds Deposit > Neteller to deposit money from Neteller to NordFX. Then you will get a window as shown below.
Provide the details requested and deposit $100 to your account.


Now you are about to trade in your real account. Open the Meta Trader 4 (MT4) platform. You may have already log in to your demo account. Click on File > Log in to Trade Account to log in to your Real account. That is shown in the following image.


Provide the information you saved at the initial NordFX account creation and login to your real account. If you correctly log on to your real account, your Account number and Server detail will be visible on top left corner of the Meta Trader 4. Apart from that your account balance is shown in Trade section of Terminal at the bottom of the Meta Trader 4.

Now lets start to trade with your real money. Please follow the following instructions to not getting any losses.


  1. Trade in a Single currency pair. Don't trade different currency pairs initially. For instance you can start trade from GBP/USD.
  2. Trade only at 0.01 lot size, don't increase it to 0.02 until you have $300 in your account.
  3. Place a single transaction at a time. Wait until it gets profit and close it.
  4. Don't place Stop Loss Margin. Whether the transaction get loss wait until it gets profit. You can withstand until it gets profit only if you place one transaction at a time with 0.01 lot size.
  5. Analyze the trend of the currency pair for a long time and only place transactions when it is at peaks.
  6. Keep your attention to any specific political, economical changes happen to the both countries involved in the currency pair.


Tuesday, February 7, 2012

How to eliminate secondary authentication request in performancepoint reports

You may have already noticed that there is two authentication requests while connecting to a performancepoint report through sharepoint integrated mode under NTLM authentication.

  1. Preliminary authentication request for the sharepoint site.
  2. Secondary authentication request for the report server(RS) web service. 

But it's not a good way to use in deployment environment, since it prompts twice for credentials, in case of client's active directory is not supported for kerberos authentication.

This problem can be eliminated using a simple methodology. The solution is very simple and straightforward.

Use the same port that you are used to create the web application (or application pool) to configure the RS web service URL. But make sure that your virtual directory name is not conflict with existing directories in your sites.


Default virtual directories are "ReportServer" and "Reports". Therefore if you have following directories, change the default virtual directory names.

http://Server Name:Port/ReportServer
http://Server Name:Port/Reports

Limitations:
Both sherepoint site collections (The sharepoint site collection used to publish reports and share point site collection used to integrate performancepoint reports) should use same web application.

Sharepoint server and report server should be in one physical server (Otherwise it will lead to double-hop problem).

If you need more detailed steps, the following figures will guide you through complete setup.

If you allocate different ports, for your web application and RS web service URL, the following authentication requests will prompt. In this illustration I have used 44000 to create my web application and RS web service URL is configured to 42000.


To eliminate the problem, first open reporting service configuration manager and change the RS web service URL port to 44000(same port used in the web application). In my demonstration I have added two URLs.

Then integrate the newly added RS web service URL using report server integration wizard and change the report server in performancepoint reports.


Hope this article would help you to eliminate secondary authentication prompt while connecting to a performancepoint report through sharepoint.


Tuesday, November 29, 2011

How to change the DataSourceView of an existing dimension

If you have two or more data source views on your analysis service project, there is a definite possibility to create dimensions using wrong data source view. But you may have confused later on, since SSAS doesn't provide you a direct way to re-change the data source view.

I found that error recently, when I deleted some columns from the Time Dimension on the database, but it wasn't reflect on my Time Dimension on the cube. When I right click and click on 'Edit Data Source View' on the Data Source View pane of the dimension editor window, it was redirected me to a different data source view. So it was a good way to identify whether the dimension is being created using appropriate data source view.

But the solution was rather simple. You only have to do open the dimension using code view and change the DataSourceViewID tag to correct data source view. (It is recommended to get the correct data source view ID from another dimension if possible)


Above method can be used to change the data source view from an existing cube as well.


Finally I would like invite you to read my new and more interesting article on How to use Forex Trading as Part Time Earning Method. It would be more beneficial and interesting thing for you.

Monday, August 8, 2011

Connecting Informix databases through SSIS

I was quite confused to find a way to connect Informix database through SSIS in Windows x64 environment few days back. I went through lot more articles on the internet, but couldn't be able to find a proper direction. But the experience I have gathered lead me to achieve the connection sucessfully and it's drive me to write an article on how to create connection between Informix through SSIS.

First download the latest version of Informix Client Software Development Kit (32bit) from IBM's website. It's a freeware but you have to register on the IBM's website to download the product. Don't go for the 64bit versions since BIDS is still a 32bit application, your 64bit providers will not be shown on the providers list.

You can download the latest version of client SDK from here.

The next step is to add a path to "C:\Windows\SysWOW64" to the begining of the path environmental variable before installing the client SDK. Otherwise you will promt an error message saying add a prefix to path variable. Then install the product including IBM data server driver package.


After intalling the client SDK, use Setnet32 tool to configure a default Informix server. You can find Setnet32 application under "All programs>IBM Informix Client SDK".


Fill Server information and Host information with correct details to your Informix server. You will find the INFORMIXDIR and INFORMIXSERVER environmental variables are filled with values regarding to default server. You don't need to create those environmental variables manually on windows environmental variables.

Then add a new entry to your servises file. Service file can be found in "C:\Windows\System32\drivers\etc".


The format of the service file is clearly mentioned to the begining of the file. In my case the first entry is my service name then port number and protocol.

After editting the service file, you can create a new Open Data Base Connection (ODBC). Don't use Data Source Administrator tool in "Program Files>Administrative Tools" insted use "C:\Windows\SysWOW64\odbcad.exe" to add and configure new data source.

Select IBM INFORMIX ODBC DRIVER and click finish. Then configurations window will pop up. Give any data source name and fill appropriate connection details. Click on apply and test connection.


Use ConnectTest Demo tool to test connection and view table data.


Now you have allmost configured your environment to connect Informix. Open BIDS and create a new SSIS project. Go to add new data source, you will find "IBM OLE DB Provider for Informix" is listed under OLE DB providers. Create new connection to the Informix server and have some fun with Data.


The server name should be given in the format of database@servername.


Set Run64BitRuntime into false under project properties (Project>Properties>Debugging).

Finally I would like invite you to read my new and more interesting article on How to use Forex Trading as Part Time Earning Method. It would be more beneficial and interesting thing for you.

Friday, June 17, 2011

Use SSIS system variables effectively

Package variables are an important piece of component to create dynamic SSIS packages. There are two types of variables inside SSIS, system variables and user defined variables. System variables are not editable but can use as read only variables. The values of the system variables are set by the package for the purpose of tracking metadata such as Package ID. Effective use of system variables increases the performance of SSIS packages and using system variables is a good development practice as well. A list of system variables included in SSIS is mentioned bellow.
  • System::ContainerStartTime
  • System::CreationName
  • System::LocaleID
  • System::ParentContainerGUID
  • System::TaskID
  • System::TaskName
  • System::TaskTransactionOption
  • System::CancelEvent
  • System::CreationDate
  • System::CreatorComputerName
  • System::CreatorName
  • System::ExecutionInstanceGUID : Unique ID for each package execution.
  • System::FailedConfigurations
  • System::InteractiveMode
  • System::LastModifiedProductVersion
  • System::MachineName : Name of the computer
  • System::OfflineMode
  • System::PackageID : Unique Id generated for the package. 
  • System::PackageName : Name of the package.
  • System::ProductVersion
  • System::StartTime : Start time of the package.
  • System::UserName : Package execution user
  • System::VersionBuild
  • System::VersionComments
  • System::VersionGUID : Unique GUID for the package version
  • System::VersionMajor
  • System::VersionMinor
Two package execution instances of same package by diferent users on different machines is dipicted on the following figures. Notice that PackageID is an unique Id for the package while ExecutionInstanceGUID is unique for the package execution.


Thursday, June 2, 2011

Sharepoint Content Deployment Using Performancepoint Import Items Wizad

Sharepoint content deployment can be done in different ways. Its very useful feature in sharepoint since devolopers would choose the most suitable deployment technique rather creating same thing again and again. This is a another major factor to commercialize sharepoint products among most of the companies and organizations. Some popular deployment techniques  are listed below.

  • If two serverfarms are physically connected by intranet, Content deployment and path jobs is the preferable solution for content deployment.
  • If two server farms are physically diconnected, you can use sharepoint backup and restore to deploy your content.
  • If top level site to be deployed to a subsite or vise vasa, sharepoint import and export make your wish.
But today Iam going to introduce a new method to deploy performancepoint contet. This method can only be used to deploy performancepoint content rather. As BI engineers most of you have to deploy sharepoint content as performancepoint content. Therefore deployng performancepoint content between serverfarms is to be done quite frequently.

So should we have to recreate our performancepoint content from the scratch, no absolutely not. Or else should we get a backup and restore it to the new site in other server farm. No its not a wise thing to do, since when you wanted to get restore previously created performancepoint content, your new site has almost created. Then you cannot lose your data. Actually you don't want to restore a whole site to get few performancepoint content.

Therefore the preferable technique would be to use Performancepoint Import Items wizad.


To import items there should be a performancepoint workspace file (*.ddwx file). When you working with performancepoint designer you can save workspace to a .ddwx file. Please make sure that only edited items (Items in the left hand pane) can save to a file. If you are newly opened the performance point designer, you should double click on each item to get those items to the left hand pane.


Then go to the BI site where you want to restore the content. (If it is a totally isolated from the parent server farm, it doesn't matters) Open the performancepoint dashboard designer. Click on the Import items. A dialog box will pop up and ask you for a source file, then browse and locate a workspace file where you want to import.

Then you have to map source lists (Data connections and Perfomancepoint content) with destination lists. The important point to note here that is, you can directly import items to lists in the subsites as well.


Then click next to start the content deployment.


Performacepoint import items wizad is a useful piece of component inside the performancepoint dashboard designer. It reaveals you a new ere to content deployment and save your development time by easily reusing performancepoint content.

Friday, May 6, 2011

How to connect two or more Performancepoint Filters to Scorecards and Reports

In this post I am not going to introduce a new thing but I would like to demonstrate a few important steps, that might mess around you and could delay your developments. That is how to make connections among performancepoint filters, scorecards and reports.

Usually connecting one filter to a report and scorecard might not a difficult task to you. Therefore I am forcusing on how to connect two or more filters to both reports and scorecards.


The scenario I have taken here like this,
  • I have two performance point filters for Month and Year.
  • I have a Scorecard which displays few KPIs.
  • I have a Report with some tables and charts.
You can do this in two different ways.
  1. The most common method is create a dashboard in performancepoint designer and deploy it to a sharepoint site..
  2. The next method is create dashboard layout in sharepoint itself, and insert performance point content as webparts.
Eventhough above two methods are seems to be two different approaches, the connection settings are almost same. But I hope to demonstrate above two methodologies. I'd like to guide you through images, since this not very much technical related thing.

To make connections between reports and filters, goto the connections in the report and create a connection to each of the report parameter.


To create connections inbetween scorecards and filters, do the same thing to the scorecards as shown below.


I am suggesting here to connect filters to the EndPoint_Page of the scorecards. If you are using sharepoint 2010, EndPoint_page cause for disabled decomposition tree. (To get decomposition tree right click on the scorecard and select decomposition tree.) To enable decomposition tree install the following hot fix to the sharepoint server.
http://support.microsoft.com/kb/2496951

If you have done correctly, your all connections would work well. Even this is not a technical article, I hope this might helpful to you when you are get stuck with selecting proper configurations in performancepoint.